Figma Prototype
What is Figma Prototyping?
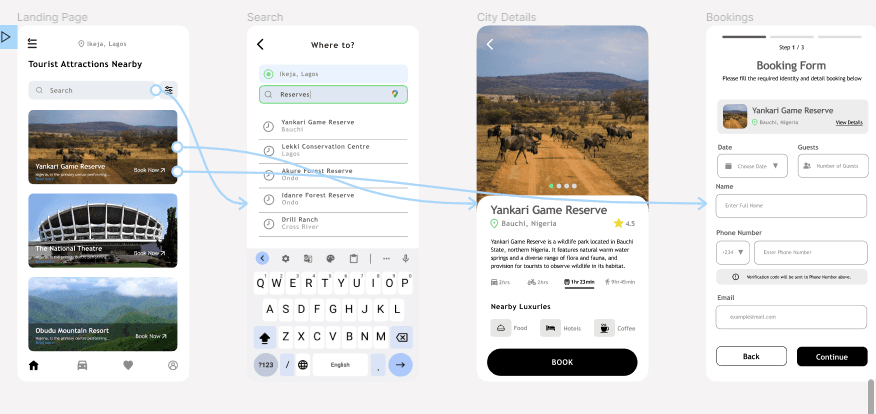
Figma prototyping allows designers to create interactive and clickable versions of their designs. It enables you to simulate user interactions, transitions, and animations, making your design concepts more tangible and easier to test.
Benefits of Using Figma Prototyping
1. Better Communication
Interactive prototypes make it easier to communicate your design ideas to stakeholders and developers. They provide a clear and engaging way to demonstrate how your design works.
2. Easy User Testing
Prototyping in Figma lets you create realistic simulations of your designs, which can be used for user testing. This helps you gather valuable feedback on the user experience and identify areas for improvement before development.
3. Faster Iterations
With Figma's prototyping tools, you can quickly create and test different design variations before the development of a feature even began. This rapid iteration process allows you to refine your designs more efficiently, leading to better user experiences.
Key Features of Figma Prototyping
1. Interactive Elements
Figma lets you turn static designs into interactive prototypes by adding clickable elements such as buttons, links, and hotspots.
2. Transitions and Animations
You can add transitions and animations between different screens and states in your prototype. These visual effects make your prototype feel more dynamic and engaging, closely resembling the production product.
3. Overlays and Modals
Figma supports the creation of overlays and modals, allowing you to simulate pop-ups, drop-down menus, and other layered interactions. Demonstrate complex interactions without cluttering your design canvas.
4. Device Frames and Presentations
Figma includes a variety of device frames that you can use to present your prototypes in context. Visualize how your design will look and function on different devices.
How to Create a Figma Prototype
Step 1: Design Your Screens
Start by designing the screens that will make up your prototype. Ensure that each screen includes all necessary elements and components for the interactions you plan to simulate.
Step 2: Switch to Prototype Mode
In Figma, switch to Prototype mode by clicking on the "Prototype" tab in the right-hand panel. This will enable you to start creating interactions and linking screens together.
Step 3: Add Interactions
Select an element on your design, such as a button, and click on the small circle handle that appears. Drag the handle to the screen you want to link it to and define the interaction type, such as "On Click" or "On Hover."
Step 4: Configure Transitions
After linking screens, configure the transitions and animations. Choose from various transition effects like "Slide In," "Fade," or "Push" and adjust the duration and easing to create smooth and realistic animations.
Step 5: Preview and Test
Use the "Present" button in the top-right corner to preview your prototype. Test all interactions and transitions to ensure they work as intended. Make any necessary adjustments to refine the user experience.
Step 6: Share Your Prototype
Once you're satisfied with your prototype, share it with stakeholders and team members by generating a shareable link. You can also embed the prototype in presentations or documentation to provide a more interactive experience.
Summary
Whether you're simulating user journeys, testing navigation, or presenting to stakeholders, Figma prototypes provide a realistic and dynamic way to bring your design ideas to life.